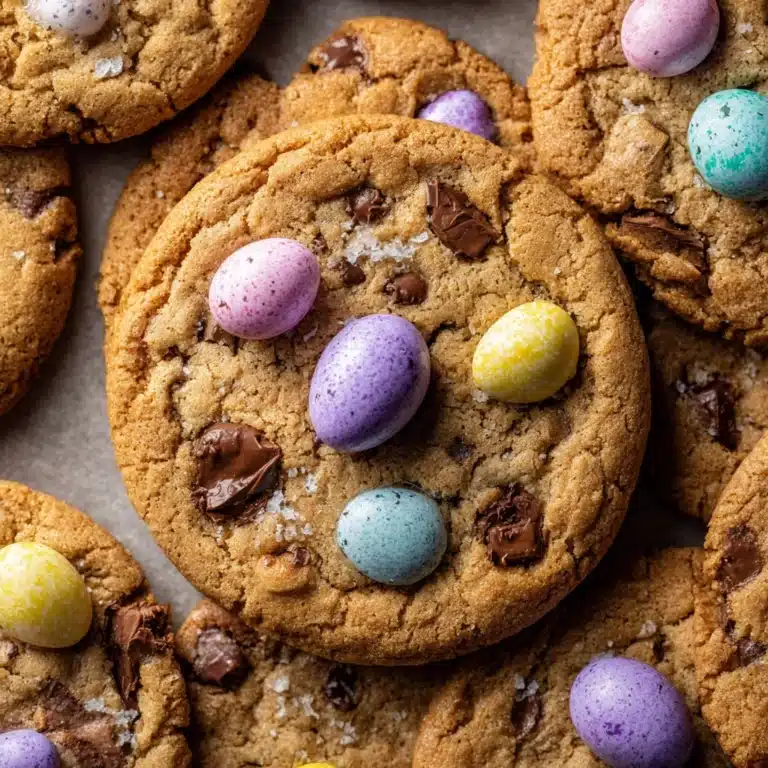
Hocus Pocus Cookies Recipe
If you’re looking to add a magical touch to your baking repertoire, the Hocus Pocus Cookies Recipe is just the spell you need! These vibrant, whimsical cookies burst with festive colors and irresistible sweetness, making them perfect for Halloween parties, cozy autumn afternoons, or anytime you want to enchant your taste buds. With a tender crumb, a medley of festive sprinkles, and decadent white chocolate chips, this recipe turns simple ingredients into a show-stopping treat that’s as fun to make as it is to eat.

Ingredients You’ll Need
The magic behind the Hocus Pocus Cookies Recipe lies in its simple yet thoughtfully chosen ingredients. Each one plays a crucial role—whether it’s creating a fluffy texture, brightening the dough with rich colors, or adding that luscious sweetness you’ll love biting into.
- 1 ½ cups butter, softened: The base for creamy, rich dough and tender cookies.
- 2 cups white sugar: Provides just the right sweet bite to balance flavors.
- 3 large eggs: Helps bind everything together and adds moisture.
- 3 tsp vanilla extract: Adds warm, comforting aroma and depth of flavor.
- 1 ½ tsp cornstarch: Keeps cookies soft and delicate by lightening the texture.
- 1 ½ tsp baking soda: Gives the perfect rise and slight crispness at the edges.
- ¾ tsp salt: Enhances the sweetness while balancing the taste.
- 2 cups cake flour: Contributes a tender, fine crumb that melts in your mouth.
- 2 ½ cups all-purpose flour: Adds structure so the cookies hold their cheerful shape.
- Orange, green, and purple gel food coloring: Vital for bringing the iconic Hocus Pocus festivity to life.
- 2 cups white chocolate chips: Sweet bursts that melt slightly, adding creamy pockets of goodness.
- Halloween sprinkles: The sparkling finishing touch to make every bite joyful and fun.
How to Make Hocus Pocus Cookies Recipe
Step 1: Prepare Baking Sheet
Start by lining your baking sheet with parchment paper—this simple step prevents sticking and ensures your cookies come out looking pristine and ready for the show.
Step 2: Cream Butter and Sugar
Use a stand mixer to beat the softened butter and sugar together until the mixture turns light and fluffy. This creaming process traps air, giving your cookies an irresistible lightness and texture.
Step 3: Add Eggs and Vanilla
Add the eggs one at a time, mixing well after each addition to ensure even incorporation. Stir in the vanilla extract for that warm, classic flavor that forms the heart of your cookie dough.
Step 4: Combine Dry Ingredients
In a separate bowl, whisk together cake flour, all-purpose flour, cornstarch, baking soda, and salt. This step evenly distributes the leavening agents to give your cookies their perfect rise and tender bite.
Step 5: Mix Dry and Wet Ingredients
Gradually add the dry ingredients into the butter mixture, mixing just until combined. Overmixing can toughen your cookies, so be gentle.
Step 6: Color the Dough
Divide your dough into three equal parts, and knead gel food coloring into each: one green, one orange, and one purple. It’s so much fun to watch the colors come to life!
Step 7: Form Cookies
Take two teaspoons from each colored dough, press them together, and roll into balls. Flatten slightly, then roll the edges in festive Halloween sprinkles. Press a few white chocolate chips into each cookie ball for little pockets of gooey delight.
Step 8: Chill Dough
Refrigerate your cookie dough balls for 30 minutes. Chilling helps firm them up so they hold their shape during baking without losing that soft-center magic.
Step 9: Preheat Oven
Set your oven to 400°F (200°C) so it’s nice and hot when your cookies are ready to go in. A properly preheated oven guarantees just the right texture and color.
Step 10: Bake Cookies
Bake your cookie creations for 12 to 14 minutes, or until their edges turn a beautiful golden hue. Then, transfer them to a wire rack to cool—giving them time to set just perfectly before you dig in.
How to Serve Hocus Pocus Cookies Recipe

Garnishes
For an extra special touch, sprinkle a few edible glitter flakes or additional Halloween-themed sugar decorations over your cookies just before serving. It adds a whimsical sparkle that’s sure to impress any guest.
Side Dishes
These cookies pair wonderfully with a warm cup of spiced apple cider or a glass of cold milk. Both provide comforting contrasts to the cookie’s sweet richness and keep the festive mood alive.
Creative Ways to Present
Arrange the cookies on a rustic wooden platter, alongside mini pumpkins and autumn leaves for a gorgeous seasonal centerpiece. Or wrap them in clear cellophane tied with orange and black ribbons to give as charming gifts to friends and loved ones.
Make Ahead and Storage
Storing Leftovers
Keep any leftover Hocus Pocus Cookies in an airtight container at room temperature for up to five days. This helps them stay soft and flavorful, ready for an enchanted snack at any time.
Freezing
If you want to save some magic for later, freeze the baked cookies in a sealed bag or container for up to three months. When you’re ready, let them thaw at room temperature to enjoy as if freshly baked.
Reheating
To revive any stored cookies, pop them in a preheated oven at 300°F (150°C) for a few minutes. This warms the chocolate chips and softens the texture, bringing back all that fresh-baked charm.
FAQs
Can I substitute the food coloring with natural ingredients?
Absolutely! You can use natural options like spinach powder for green, beet juice for purple, or carrot juice for orange. Keep in mind natural colors might be subtler than gel food coloring but add a lovely earthy tone.
Can I make this recipe gluten-free?
You can experiment by replacing the flours with a gluten-free baking blend, but be sure it includes xanthan gum or another binder to maintain the dough’s texture. The results can vary, so tweaking baking times might be necessary!
What if I don’t have cake flour on hand?
You can substitute cake flour by mixing 2 cups all-purpose flour minus 4 tablespoons combined with 4 tablespoons cornstarch to mimic its delicate texture. This helps keep the cookies tender without losing structure.
How do I prevent the colors from mixing too much?
Divide and color the dough carefully, and when forming cookies, press the differently colored doughs together gently without overmixing. Chilling the dough also helps maintain distinct color patches during baking.
Can I make the dough without chilling?
While you technically can, chilling is highly recommended. It keeps the dough firm so cookies hold their shape and prevents spreading, resulting in a prettier and more festive final product.
Final Thoughts
The Hocus Pocus Cookies Recipe is a truly magical way to bring fun, color, and deliciousness to your baking adventures. Whether you’re making them for a special occasion or just because you want to treat yourself, these cookies promise to delight every single time. So gather your ingredients, embrace the vibrant spirit, and get ready to create some bewitching bites that everyone will adore!
Print
Hocus Pocus Cookies Recipe
- Total Time: 1 hour 14 minutes
- Yield: 24 servings 1x
Description
Hocus Pocus Cookies are delightful, colorful Halloween-themed treats featuring three vibrant dough colors—orange, green, and purple—swirled together into irresistible cookies studded with white chocolate chips and festive sprinkles. These soft, buttery cookies are perfect for celebrating the spooky season with a fun and flavorful twist.
Ingredients
Main Ingredients
- 1 ½ cups butter, softened
- 2 cups white sugar
- 3 large eggs
- 3 tsp vanilla extract
- 1 ½ tsp cornstarch
- 1 ½ tsp baking soda
- ¾ tsp salt
- 2 cups cake flour
- 2 ½ cups all-purpose flour
Coloring and Decorations
- Orange, green, and purple gel food coloring
- 2 cups white chocolate chips
- Halloween sprinkles
Instructions
- Prepare Baking Sheet: Line a baking sheet with parchment paper to prevent sticking and ensure even baking.
- Cream Butter and Sugar: Using a stand mixer, beat the softened butter and white sugar together until the mixture becomes light and fluffy, which helps create a tender texture in the cookies.
- Add Eggs and Vanilla: Incorporate the eggs one at a time, mixing well after each addition to fully combine. Then stir in the vanilla extract to add flavor depth.
- Combine Dry Ingredients: In a separate bowl, whisk together the cake flour, all-purpose flour, cornstarch, baking soda, and salt to ensure all leavening agents and seasonings are evenly distributed.
- Mix Dry and Wet Ingredients: Gradually add the dry flour mixture into the wet butter and sugar batter, mixing until fully combined but not overworked.
- Color the Dough: Divide the cookie dough evenly into three portions. Add orange gel food coloring to one, green to another, and purple to the last portion. Knead each color separately until the color is uniform.
- Form Cookies: Scoop two teaspoons of each colored dough, press the three colors together, and roll into balls. Flatten slightly, roll the edges in Halloween sprinkles, and press white chocolate chips onto the tops for a festive look.
- Chill Dough: Place the prepared dough balls in the refrigerator and chill for 30 minutes to help the cookies hold their shape while baking.
- Preheat Oven: Set your oven to 400°F (200°C) to prepare for baking.
- Bake Cookies: Bake the chilled dough balls for 12-14 minutes or until the edges turn golden brown. Remove from the oven and let cool on a wire rack before serving.
Notes
- Ensure the butter is softened but not melted for optimal creaming results.
- Use gel food coloring for vibrant colors without altering dough consistency.
- Chilling the dough is essential to prevent spreading and maintain defined colors.
- Keep an eye on the cookies in the oven as baking times can vary depending on your oven.
- Store cookies in an airtight container to keep them fresh for up to one week.
- Prep Time: 20 minutes
- Cook Time: 14 minutes
- Category: Dessert
- Method: Baking
- Cuisine: American


