Classic Popovers Recipe
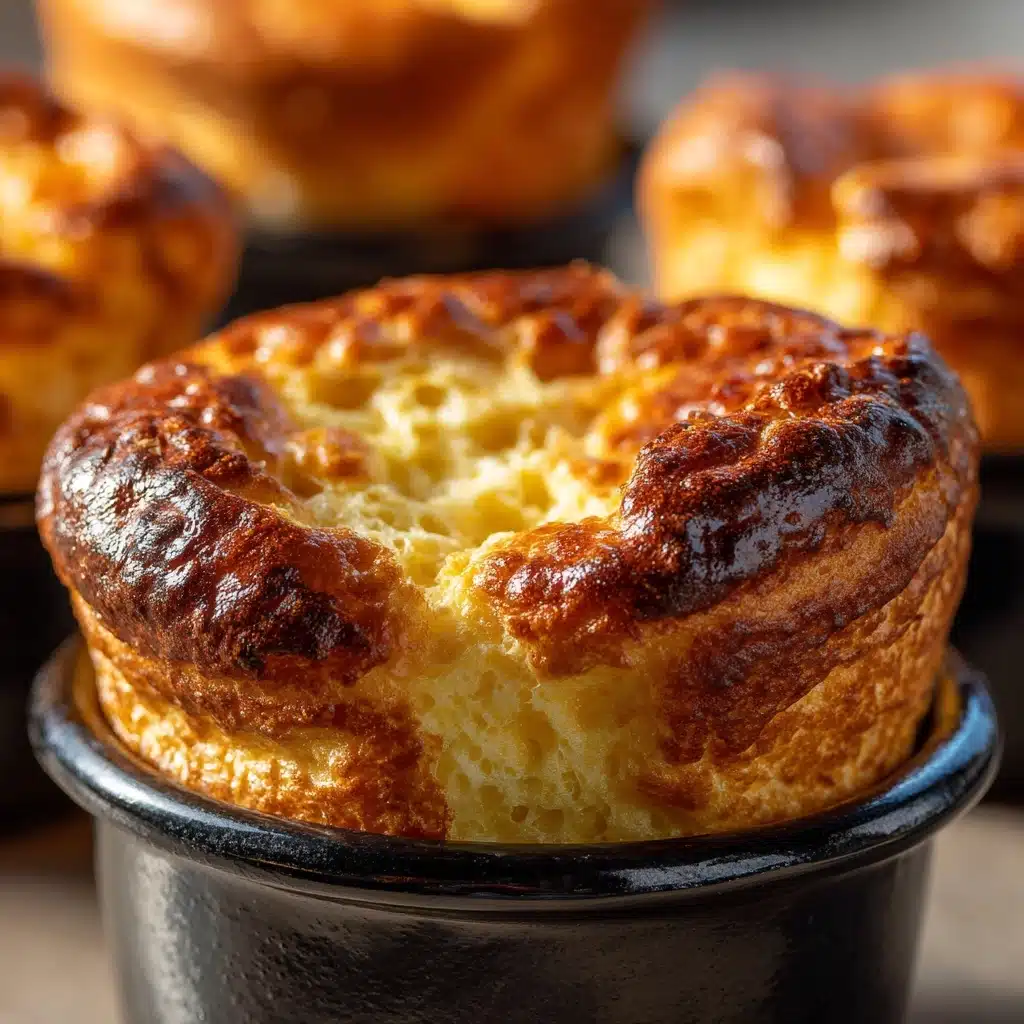
Classic Popovers are the kind of kitchen magic that makes you believe in the power of simple ingredients. Imagine biting into a golden, sky-high pastry that’s crisp on the outside and airy inside—perfect for soaking up butter or jam. Whether you’re aiming to impress for brunch or just craving a cozy treat, this recipe brings the warmth of homemade bread rolls to your table with almost no fuss. From their irresistible puff to their delicate flavor, these little wonders are destined to become a go-to favorite.
Ingredients You’ll Need
The beauty of Classic Popovers is how they transform the most basic pantry staples into something spectacular. Each ingredient plays a starring role—some for flavor, others for texture, and all for that glorious rise and golden hue.
- All-purpose flour: The foundation for structure, giving the popovers their tender crumb and just enough strength to hold that signature puff.
- Whole milk (at room temperature): Adds moisture and richness, and using it at room temp helps the batter rise properly.
- Large eggs (at room temperature): Eggs are the secret to the billowy lift and custardy texture inside every popover.
- Salt: Just a touch brings out the subtle flavors and balances the richness.
- Unsalted butter (melted): For extra flavor, tenderness, and that irresistible golden finish.
- Additional butter or oil (for greasing the pan): Ensures an easy release and encourages a crisp exterior.
How to Make Classic Popovers
Step 1: Preheat and Prepare the Pan
Start by heating your oven to a sizzling 450°F. Generously grease your popover pan or muffin tin with softened butter or a splash of oil, making sure to coat every nook and cranny. Pop the empty, greased pan into the oven for about 5 minutes—this step gets it hot and ready for immediate action, which is key for achieving the iconic pop.
Step 2: Mix the Dry Ingredients
In a large mixing bowl, whisk together the all-purpose flour and salt. This quick step ensures a wonderfully even distribution of salt, so every bite of your Classic Popovers is perfectly seasoned.
Step 3: Combine the Wet Ingredients
Crack the eggs into a separate bowl and add the room-temperature milk. Whisk these together until the mixture looks pale and a bit frothy—this injects just enough air to help the popovers rise sky-high.
Step 4: Create the Batter
Slowly pour the milk and egg mixture into the bowl with the flour and salt, whisking as you go. The goal is a silky, lump-free batter that’s thinner than pancake batter. Finally, stir in the melted butter, which adds richness and helps create those glorious golden tops.
Step 5: Fill the Hot Pan
Carefully remove the preheated pan from the oven (it’ll be hot, so use oven mitts!). Without delay, fill each cup about halfway with the batter. The sizzle as the batter hits the pan is a good sign—this is what creates the signature rise of Classic Popovers.
Step 6: Bake—No Peeking!
Place the pan back in the oven and bake at 450°F for 15 minutes. Then, without opening the oven, reduce the temperature to 350°F and bake for another 15–20 minutes until the popovers are puffed and a deep golden brown. Resist the urge to peek—opening the oven too soon can cause them to collapse!
Step 7: Release Steam and Serve
Once your popovers are gloriously golden, remove them from the oven and immediately prick each with a sharp knife to let the steam escape. This keeps them crisp and prevents sogginess. Enjoy them warm for the ultimate comfort.
How to Serve Classic Popovers

Garnishes
Classic Popovers shine with a pat of creamy butter, a drizzle of honey, or a swipe of fruity jam. For a savory twist, try a sprinkle of flaky sea salt or a dusting of grated cheese as soon as they come out of the oven.
Side Dishes
These airy beauties are perfect alongside scrambled eggs, smoked salmon, or a simple green salad. They also make a stellar companion to hearty soups or roasted vegetables, soaking up all those delicious juices.
Creative Ways to Present
Classic Popovers can be the star of any table—stack them high on a rustic breadboard, serve in a basket lined with a cheerful napkin, or plate individually for an elegant brunch. For a fun twist, fill them with herbed cream cheese or chicken salad for a bite-sized appetizer.
Make Ahead and Storage
Storing Leftovers
If you have any Classic Popovers left (which is rare!), let them cool completely before storing in an airtight container at room temperature. They’ll stay fresh for about a day, though they’re always best enjoyed right out of the oven.
Freezing
Popovers freeze beautifully! Once cooled, wrap each one tightly in plastic wrap and place in a freezer bag. They’ll keep for up to two months—just thaw at room temperature whenever you need a quick treat.
Reheating
To recapture the fresh-from-the-oven magic, reheat Classic Popovers in a 350°F oven for 5–8 minutes. This brings back their crisp exterior and soft interior, making them taste almost as good as new.
FAQs
Why do my Classic Popovers sometimes collapse?
Popovers collapse when steam escapes too soon, often from opening the oven door while baking. Make sure to keep the oven closed until they’re fully baked, and always prick them right away to release excess steam.
Can I use a regular muffin tin if I don’t have a popover pan?
Absolutely! A muffin tin works well, though your Classic Popovers may be a bit shorter. Grease the cups thoroughly and fill only halfway for the best results.
What’s the secret to getting them super puffy?
Room temperature eggs and milk are crucial. Also, preheating the pan before adding the batter helps the popovers puff up dramatically right from the start.
Can I flavor the batter with herbs or cheese?
Yes! Add a pinch of finely grated cheese, fresh herbs, or even a dash of cracked pepper to the batter for a savory variation on Classic Popovers. Just don’t overdo it—too many extras can weigh down the batter.
How do I know when the popovers are done?
They’re ready when they’re deep golden brown, puffed high, and sound hollow when tapped. Underbaked popovers will be doughy inside, so err on the side of a few extra minutes if you’re unsure.
Final Thoughts
If you’ve never tried baking Classic Popovers before, now’s the perfect time to let your oven work a little magic. With just a handful of ingredients and a lot of love, you’ll have golden, puffy delights that are sure to disappear faster than you think. Give it a go—you might just find yourself making them week after week!
Print
Classic Popovers Recipe
- Total Time: 45 minutes
- Yield: 6 popovers 1x
- Diet: Vegetarian
Description
Classic Popovers are light, airy, and golden-brown baked rolls that are perfect as a delightful side dish. Made from a simple batter of flour, milk, eggs, and butter, they puff up beautifully in a hot oven to create a hollow center, making them ideal for savory or sweet accompaniments.
Ingredients
Main Ingredients
- 1 cup all-purpose flour
- 1 cup whole milk (at room temperature)
- 2 large eggs (at room temperature)
- 1/2 teaspoon salt
- 1 tablespoon unsalted butter (melted)
- Additional butter or oil for greasing the pan
Instructions
- Preheat Oven and Prepare Pan: Preheat your oven to 450°F (232°C). Generously grease a popover pan or muffin tin with butter or oil and place it in the oven to preheat for about 5 minutes. This ensures the batter starts cooking immediately upon contact, helping the popovers rise.
- Mix Dry Ingredients: In a mixing bowl, whisk together the all-purpose flour and salt until well combined. This ensures even distribution of salt and prevents lumps in the batter.
- Combine Wet Ingredients: In a separate bowl, beat the eggs and room temperature milk together until well combined and slightly frothy. This incorporation of air helps in creating the light texture.
- Create Batter: Gradually whisk the wet ingredients into the dry ingredients until a smooth, thin batter forms without lumps. Then, stir in the melted unsalted butter gently to incorporate fat for tenderness and flavor.
- Fill the Pan: Carefully remove the hot pan from the oven and immediately fill each cup about halfway with the batter. The hot pan jump-starts the rise of the batter as it begins to bake.
- Initial Bake at High Heat: Place the pan back in the oven and bake for 15 minutes at 450°F (232°C). This high temperature causes the batter to puff up dramatically.
- Reduce Heat and Continue Baking: Without opening the oven door, reduce the temperature to 350°F (177°C) and bake for an additional 15–20 minutes until the popovers are puffed and golden brown. Avoid opening the oven to prevent collapsing.
- Release Steam and Serve: Once done, remove the popovers from the oven and immediately prick each one with a sharp knife to release steam, preventing sogginess. Serve warm for the best texture and flavor.
Notes
- Use room temperature ingredients for best rise and texture.
- Do not open the oven door during baking to prevent the popovers from collapsing.
- For a savory twist, add a pinch of grated cheese or fresh herbs like thyme or chives to the batter.
- Fill the pan only halfway as the batter rises significantly during baking.
- Prick the popovers immediately after baking to release steam and keep them crisp.
- Prep Time: 10 minutes
- Cook Time: 35 minutes
- Category: Side Dish
- Method: Baking
- Cuisine: American
Nutrition
- Serving Size: 1 popover
- Calories: 120
- Sugar: 1g
- Sodium: 150mg
- Fat: 5g
- Saturated Fat: 2g
- Unsaturated Fat: 2g
- Trans Fat: 0g
- Carbohydrates: 14g
- Fiber: 0g
- Protein: 4g
- Cholesterol: 70mg


