Cherry Pie Bars Recipe
“`html
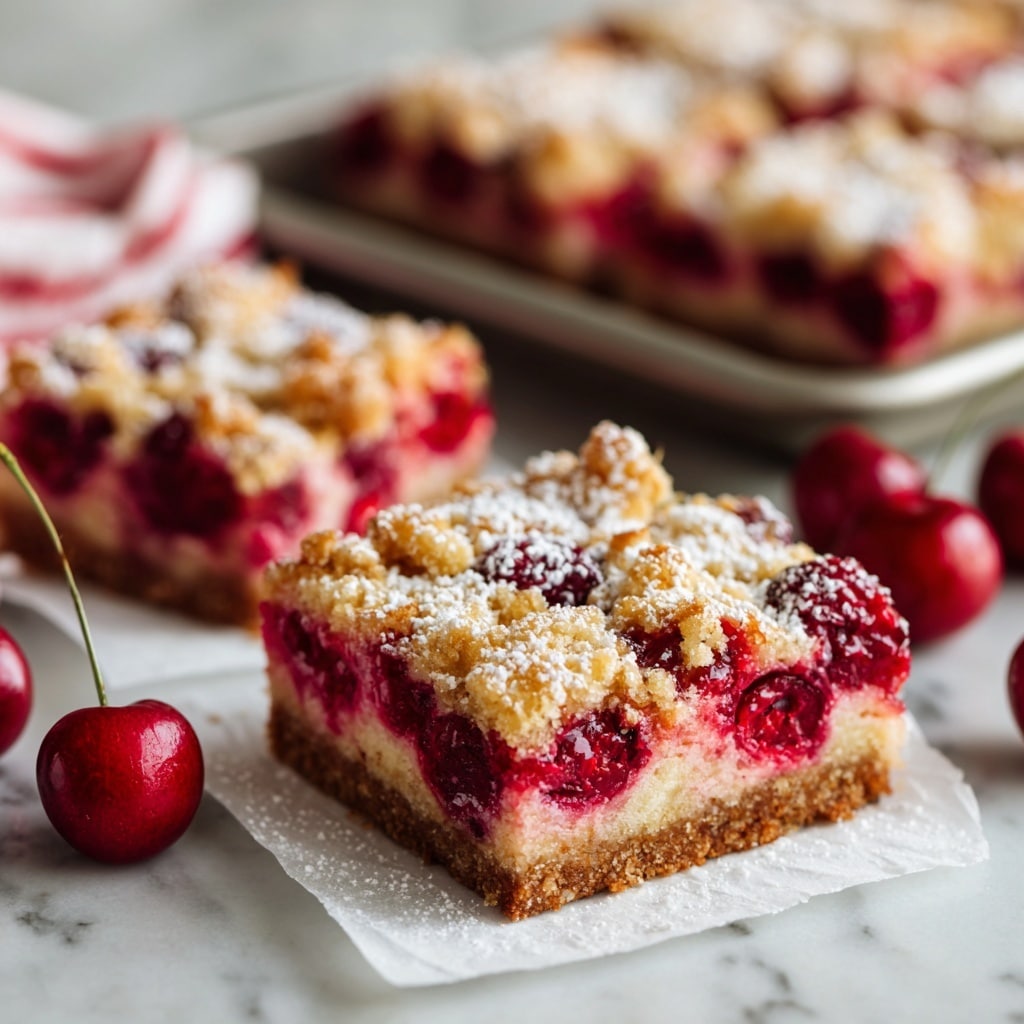
If you have a soft spot for cherry desserts that blend the perfect balance of tart and sweet, get ready to fall head over heels with this Cherry Pie Bars Recipe. These bars combine a buttery, crumbly crust with a luscious cherry filling, finished off with a sweet glaze that ties everything together in the most delightful way. Whether you’re craving a quick homemade treat or planning to impress guests at your next gathering, these cherry pie bars are a simple yet irresistible option that everyone will adore.

Ingredients You’ll Need
You won’t believe how straightforward this Cherry Pie Bars Recipe is when you see the ingredients – each one plays a crucial role in creating that perfect harmony of taste, texture, and vibrant color. Nothing too fancy, but everything you need for that homemade magic.
- 1 cup unsalted butter, melted: This adds richness and helps bind the crust and crumble topping.
- 1 cup granulated sugar: Sweetens both the crust and the cherry filling for balanced flavor.
- 1/2 cup packed brown sugar: Adds a lovely depth of caramel-like flavor to the crust.
- 1 teaspoon vanilla extract: Enhances the overall aroma and taste of the crust.
- 3 cups all-purpose flour: The base that creates that tender yet sturdy crust and crumble.
- 1/2 teaspoon salt: Brings out the sweetness and balances the flavors.
- 4 cups fresh or frozen cherries, pitted: The heart of the recipe delivering juicy bursts of tartness.
- 1 cup granulated sugar: Sweetens the cherry filling to complement its natural tang.
- 2 tablespoons cornstarch: Thickens the cherry filling so it holds together beautifully.
- 1 tablespoon lemon juice: Brightens the cherry flavor and adds subtle acidity.
- 1 teaspoon almond extract: Brings a nutty warmth that perfectly accents the cherries.
- 1 cup powdered sugar: The base for the glaze, providing sweetness and smooth texture.
- 2-3 tablespoons milk: Adjusts the glaze consistency for easy drizzling.
- 1/2 teaspoon vanilla extract: Adds a comforting vanilla note to the glaze.
How to Make Cherry Pie Bars Recipe
Step 1: Preheat and Prepare Your Pan
Start by preheating your oven to 350°F (177°C) to get it ready for baking those irresistible bars. Line a 9×13-inch baking pan with parchment paper, making sure to leave some overhang on the sides. This handy trick makes lifting your cherry bars out a breeze once they’re baked and cooled.
Step 2: Make the Crust and Topping
In a large bowl, combine the melted butter with granulated sugar, brown sugar, and vanilla extract. This mixture creates a rich and fragrant base. Then add the all-purpose flour and salt, mixing until a thick dough forms. Set aside exactly one cup of this dough for the crumbly topping, and press the rest evenly into your lined baking pan to form the crust. This crust will be the perfect buttery foundation for your luscious cherries.
Step 3: Prepare the Cherry Filling
In a separate bowl, toss together the fresh or frozen pitted cherries with granulated sugar, cornstarch, lemon juice, and almond extract. The cornstarch acts as your thickener, so the filling won’t be too runny, while the lemon juice adds a little zing that wakes up the cherry flavor. The almond extract gives it that classic cherry-pie warmth without overpowering the fruit.
Step 4: Assemble the Bars
Spread your cherry filling evenly on top of the crust, making sure to distribute the fruit and syrup nicely. Then crumble the reserved dough over the cherry layer, covering as much as possible for that delicious crumbly top. This two-layered texture is one of the highlights of this Cherry Pie Bars Recipe.
Step 5: Bake Until Golden and Bubbling
Bake in your preheated oven for 45 to 55 minutes. You’ll know they’re done when the topping takes on a light golden hue and you see the cherry filling bubbling happily underneath. If the topping starts browning too fast, loosely cover the pan with aluminum foil to avoid burning.
Step 6: Cool and Add the Glaze
Once baked, allow your bars to cool completely in the pan on a wire rack. This cooling step is essential because it lets the cherry filling set properly. While waiting, whisk together powdered sugar, milk, and vanilla extract to create a smooth glaze. Drizzle this sweet glaze over the bars just before slicing into squares and serving. The glaze adds a lovely finishing touch that’s hard to resist.
How to Serve Cherry Pie Bars Recipe
Garnishes
One of the best things about these cherry pie bars is how beautifully you can dress them up. Consider a light dusting of powdered sugar for a snow-kissed look, or sprinkle some finely chopped toasted almonds on top of the glaze to echo that almond extract flavor. Fresh mint leaves also add a pop of green and a refreshing hint.
Side Dishes
These bars shine as a standalone treat, but pairing them with a scoop of vanilla ice cream or a dollop of freshly whipped cream takes the experience next level. If you prefer something less traditional, a small bowl of Greek yogurt on the side can balance the sweetness with its creamy tang.
Creative Ways to Present
For parties or gifts, cut these bars into neat little squares and arrange them on a pretty platter with some fresh cherries scattered around. Wrapping individual bars in parchment paper tied with twine makes for an adorable homemade gift. You can even add a drizzle of melted dark chocolate over the glaze for an eye-catching twist that adds decadent richness.
Make Ahead and Storage
Storing Leftovers
These cherry pie bars keep beautifully in an airtight container at room temperature for up to two days. For longer freshness, store them in the refrigerator, where they stay delicious for about a week. Just make sure the container is sealed tightly to prevent the bars from drying out.
Freezing
Cherry pie bars freeze wonderfully, especially if you want to prep ahead. Wrap individual bars tightly in plastic wrap and then place them in a freezer-safe bag or container. They can be frozen for up to three months. Thaw overnight in the fridge before serving to maintain their texture and flavor.
Reheating
If you enjoy your bars warm, gently reheat them in a 300°F oven for about 10 minutes or until warmed through. Avoid microwaving if possible, as it can make the crust chewy instead of crisp. A quick reheat brings back that freshly baked feel that makes this Cherry Pie Bars Recipe so comforting.
FAQs
Can I use frozen cherries for this recipe?
Absolutely! Frozen cherries work just as well as fresh ones. Just make sure to thaw and drain any excess liquid before mixing them into the filling to avoid soggy bars.
Is it possible to make this recipe gluten-free?
You can substitute the all-purpose flour with a gluten-free baking blend. Look for one with xanthan gum included for the best texture, as it helps hold the bars together just right.
Can I substitute the almond extract?
If almond isn’t your favorite, you can skip it or replace it with a touch of vanilla extract. The cherry flavor will still shine beautifully, but the almond adds a traditional hint that many love.
How do I prevent the topping from burning before the filling is cooked?
If the topping browns too quickly, loosely cover the pan with aluminum foil partway through baking. This will protect the crust while allowing the filling to finish cooking and bubbling.
Can I double the recipe for a larger batch?
Definitely! Just use a larger baking dish or two pans and adjust baking time as needed. Keep an eye on the bars to prevent overbaking, especially with thicker layers.
Final Thoughts
This Cherry Pie Bars Recipe has earned a special spot in my heart because it delivers that perfect combination of flavor, texture, and simplicity every single time. Whether you’re baking for a crowd or savoring a cozy dessert at home, these bars never fail to bring smiles around the table. I truly hope you’ll give them a try and create your own sweet memories with this lovely homemade treat.
“`
Print
Cherry Pie Bars Recipe
- Total Time: 1 hour 10 minutes
- Yield: 16 servings 1x
Description
Delight in these Cherry Pie Bars that combine a buttery crust with a luscious cherry filling and a sweet vanilla glaze. Perfect for serving at gatherings or as a comforting homemade treat, these bars offer the classic flavors of cherry pie in an easy-to-cut, shareable form.
Ingredients
Crust and Topping
- 1 cup unsalted butter, melted
- 1 cup granulated sugar
- 1/2 cup packed brown sugar
- 1 teaspoon vanilla extract
- 3 cups all-purpose flour
- 1/2 teaspoon salt
Cherry Filling
- 4 cups fresh or frozen cherries, pitted
- 1 cup granulated sugar
- 2 tablespoons cornstarch
- 1 tablespoon lemon juice
- 1 teaspoon almond extract
Glaze
- 1 cup powdered sugar
- 2–3 tablespoons milk
- 1/2 teaspoon vanilla extract
Instructions
- Preheat Oven: Preheat your oven to 350°F (177°C). Line a 9×13-inch baking pan with parchment paper, ensuring there is enough overhang to lift the bars out easily after baking.
- Make the Crust and Topping: In a large bowl, whisk together melted butter, granulated sugar, brown sugar, and vanilla extract. Add in the flour and salt, mixing until a thick dough forms. Reserve 1 cup of this dough for the topping and press the remainder evenly into the prepared pan to create the crust.
- Prepare the Cherry Filling: In a medium bowl, combine the pitted cherries, granulated sugar, cornstarch, lemon juice, and almond extract. Stir thoroughly so the cherries are evenly coated and the filling is slightly thickened.
- Assemble the Bars: Spread the cherry filling evenly over the crust layer in the baking pan. Crumble the reserved dough evenly over the cherry layer to form the topping.
- Bake: Bake the bars for 45-55 minutes until the topping is lightly golden and the cherry filling is bubbling. If the topping browns too quickly, loosely cover the pan with aluminum foil to prevent burning.
- Cool and Glaze: Remove the bars from the oven and allow them to cool completely in the pan on a wire rack. In a small bowl, whisk together powdered sugar, milk, and vanilla extract to make the glaze. Drizzle the glaze uniformly over the cooled bars.
- Serve: Once glazed, cut the bars into 16 squares and serve. Store leftovers in an airtight container.
Notes
- Using fresh or frozen cherries works well; if using frozen, thaw and drain excess juice before mixing.
- Make sure to allow the bars to cool completely before glazing for the best texture and appearance.
- If the topping browns too soon, tent the pan with foil to ensure even baking.
- These bars can be stored at room temperature for up to 2 days or refrigerated for longer freshness.
- For an extra touch, add chopped nuts to the topping dough before baking.
- Prep Time: 20 minutes
- Cook Time: 50 minutes
- Category: Dessert
- Method: Baking
- Cuisine: American


