Brownie Waffles Recipe
Imagine waking up to the irresistible aroma of rich chocolate and the crispy edges of a freshly baked waffle—yes, we’re talking about Brownie Waffles! This delightful breakfast recipe brings the fudgy decadence of brownies together with the morning magic of waffles, delivering a treat that’s both comforting and surprisingly wholesome. With each bite, you get everything you crave in a chocolatey breakfast: a tender, cake-like interior, crispy texture, and just the right amount of sweet. These gluten-free Brownie Waffles are a game-changer for lazy weekends or special occasions—and trust me, one taste will have you hooked!
Ingredients You’ll Need
Brownie Waffles are the perfect blend of simple pantry staples and wholesome ingredients, each playing a unique role in creating their incredible flavor and texture. Here’s what you’ll need, along with why you shouldn’t skip a single one:
- Almond Flour: This gluten-free hero gives the waffles a tender bite and subtle nuttiness, without being heavy or dry.
- Unsweetened Cocoa Powder: Deepens the chocolate flavor; use a good quality cocoa for the most intense, brownie-like taste.
- Baking Soda: Ensures the waffles puff just enough for that plush, cakey interior.
- Salt: A little goes a long way, enhancing and balancing all the chocolatey notes.
- Large Eggs: Bind the batter together, creating structure and helping the waffle hold up to toppings.
- Maple Syrup or Honey: Adds natural sweetness with a subtle hint of caramel; feel free to choose your favorite!
- Unsweetened Applesauce: Keeps the waffles moist without extra fat and brings a touch of natural sweetness.
- Melted Coconut Oil: Helps crisp up the edges and adds a faint, tropical undertone—don’t worry, it won’t overpower!
- Vanilla Extract: Rounds out the chocolate, making the waffles smell and taste like a true bakery treat.
- Mini Dark Chocolate Chips (optional): A stir-in for chocoholics! These melt into gooey pockets, making every bite extra special.
How to Make Brownie Waffles
Step 1: Preheat the Waffle Iron
Before you muster up that heavenly batter, get your waffle iron heating so it’s ready for action. Follow your manufacturer’s instructions—it’s worth waiting for the right temperature so your Brownie Waffles cook evenly and reach that crisp perfection.
Step 2: Mix the Dry Ingredients
Grab a medium bowl and whisk together the almond flour, unsweetened cocoa powder, baking soda, and salt. It’s a simple step, but evenly distributing these key players ensures your waffles rise properly and taste balanced in every bite.
Step 3: Prepare the Wet Ingredients
In a separate bowl, beat the eggs until nicely blended, then stir in the maple syrup (or honey), applesauce, melted coconut oil, and vanilla extract. This liquid gold will give your Brownie Waffles structure, moisture, and all those lovely flavors that make them unforgettable.
Step 4: Combine the Batter
Pour your wet mixture into the dry mixture and gently stir until a smooth, cohesive batter forms—think brownie batter, but just a tad thicker for waffle integrity. If you’re adding those mini chocolate chips, now’s the time to fold them in for melty, gooey pockets of delight.
Step 5: Cook the Waffles
Lightly grease your preheated waffle iron to prevent sticking (a quick swipe with coconut oil spray or a pastry brush works wonders). Spoon about ⅓ cup of batter per waffle, spreading slightly to the edges. Close the lid and cook for 3–5 minutes until crisp on the outside, tender on the inside, and your kitchen smells like pure happiness. Gently lift out each Brownie Waffle and get ready to serve them up warm!
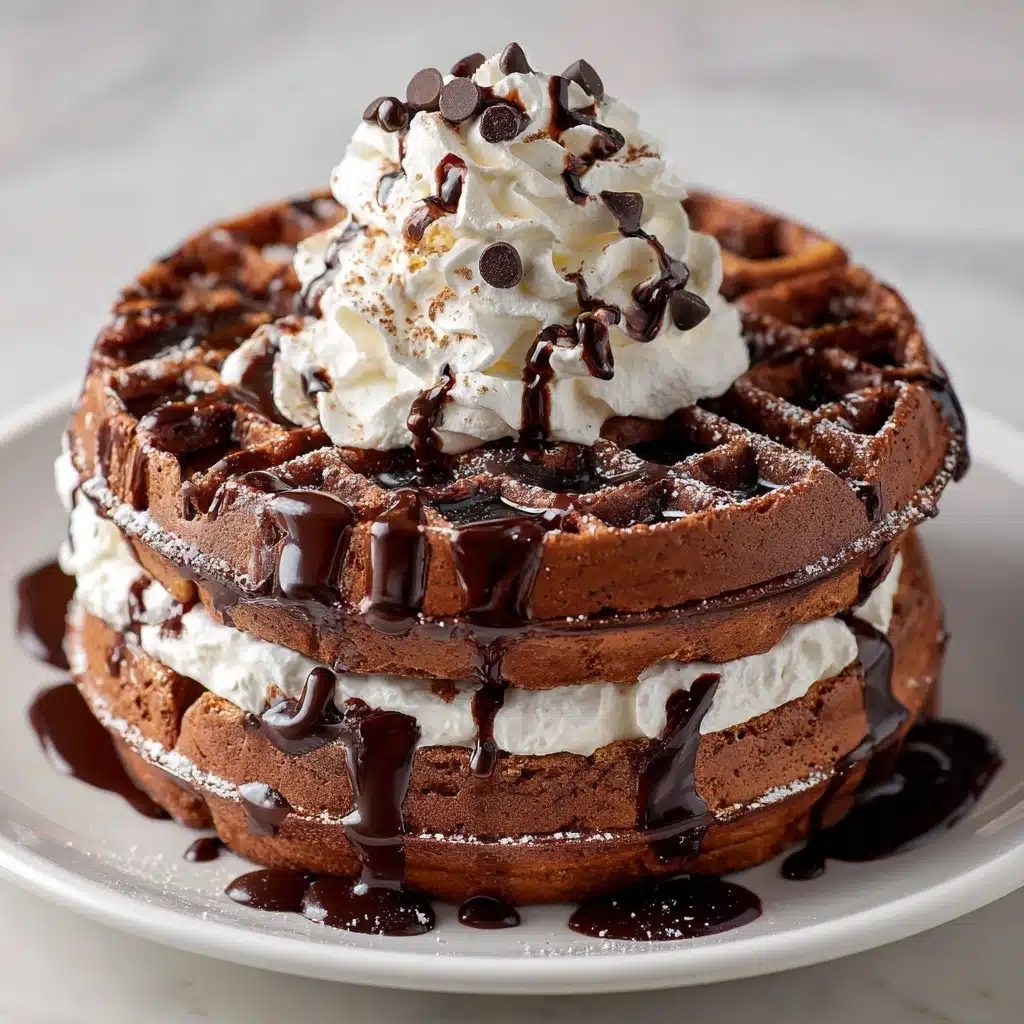
How to Serve Brownie Waffles

Garnishes
These waffles love to be dressed up! Try a dusting of powdered sugar, a drizzle of creamy nut butter, or a handful of fresh berries. For dessert vibes, a scoop of vanilla yogurt or a squiggle of homemade chocolate sauce is pure joy.
Side Dishes
Pair your Brownie Waffles with fresh fruit salad, tangy Greek yogurt, or even a simple smoothie to balance out the richness. For a brunch spread, they go beautifully alongside crispy bacon or scrambled eggs for a sweet-and-savory combo.
Creative Ways to Present
Turn your Brownie Waffles into something interactive by serving them in wedges for dunking, stacking them with layers of whipped cream and berries, or cutting them into bite-sized pieces for a waffle sundae bar—everyone gets to build their own edible masterpiece!
Make Ahead and Storage
Storing Leftovers
Let any extra Brownie Waffles cool to room temperature, then store them in an airtight container in the fridge for up to 3 days. They’ll stay moist and delicious, ready for a speedy chocolate fix anytime.
Freezing
Brownie Waffles are freezer champs! Pop them in a single layer on a baking sheet to freeze, then transfer to a zip-top bag or container. They’ll keep for up to 2 months. Don’t forget to label them—you’ll want to know exactly what chocolatey goodness awaits you.
Reheating
For the crispiest results, reheat frozen or chilled waffles in a toaster or toaster oven. A quick 2–3 minutes does the trick and brings them right back to their freshly-made magic.
FAQs
Can I make this recipe dairy-free?
Absolutely! Brownie Waffles are naturally dairy-free if you use dairy-free chocolate chips. All the other ingredients are already dairy-free, so no extra swaps required.
Can I use another flour instead of almond flour?
This recipe is designed for almond flour’s unique texture and flavor, but you can experiment with hazelnut flour or a gluten-free baking blend—just keep an eye on the liquid ratio as substitutions may change the batter consistency.
What’s the best way to get crisp edges?
Make sure your waffle iron is fully preheated, don’t overfill with batter, and allow the Brownie Waffles to cook until the edges are visibly crisp and the aroma is irresistible. A little extra coconut oil for greasing also helps boost the crunch.
Can I double the recipe?
Definitely! Just double each ingredient and cook in batches. Keep finished waffles warm on a baking sheet in a low oven (about 200°F) so everyone can dig in together.
How do I add extra protein for breakfast?
For a boost, mix in a scoop of chocolate protein powder and thicken the batter with a touch of almond milk if needed. This tweak makes your Brownie Waffles even more satisfying and perfect after a morning workout!
Final Thoughts
If you’re searching for a breakfast (or brunch, or dessert) that totally wows and still fits a healthy lifestyle, don’t sleep on these Brownie Waffles. They bring a smile to every morning, are endlessly customizable, and make anyone at the table feel extra special. Give them a try—you might just find yourself making them on repeat!
Print
Brownie Waffles Recipe
- Total Time: 25 minutes
- Yield: 4 waffles 1x
- Diet: Vegetarian
Description
Indulge in a delightful twist on traditional waffles with these Brownie Waffles. Rich in chocolate flavor and made with almond flour, these gluten-free waffles are a perfect treat for a special breakfast or brunch.
Ingredients
Dry Ingredients:
- 1 cup almond flour
- ¼ cup unsweetened cocoa powder
- ½ teaspoon baking soda
- ¼ teaspoon salt
Wet Ingredients:
- 2 large eggs
- ¼ cup maple syrup or honey
- ¼ cup unsweetened applesauce
- 2 tablespoons melted coconut oil
- 1 teaspoon vanilla extract
- ¼ cup mini dark chocolate chips (optional)
Instructions
- Preheat the Waffle Iron: Preheat your waffle iron following the manufacturer’s instructions.
- Prepare Dry Ingredients: In a medium bowl, whisk together almond flour, cocoa powder, baking soda, and salt.
- Combine Wet Ingredients: In a separate bowl, beat the eggs, then mix in maple syrup, applesauce, melted coconut oil, and vanilla extract.
- Mix Batter: Combine the wet and dry ingredients to form a smooth batter. Fold in mini chocolate chips if desired.
- Cook Waffles: Lightly grease the waffle iron and pour in the batter (about ⅓ cup per waffle). Cook until set and crisp, typically 3–5 minutes.
- Serve: Carefully remove waffles and serve warm with toppings of your choice.
Notes
- For added protein, incorporate 1 scoop of chocolate protein powder and adjust consistency with almond milk if necessary.
- These waffles freeze well and can be reheated in a toaster for a quick breakfast option.
- Prep Time: 10 minutes
- Cook Time: 15 minutes
- Category: Breakfast
- Method: Waffle Iron
- Cuisine: American
Nutrition
- Serving Size: 1 waffle
- Calories: 270
- Sugar: 10g
- Sodium: 160mg
- Fat: 18g
- Saturated Fat: 6g
- Unsaturated Fat: 10g
- Trans Fat: 0g
- Carbohydrates: 20g
- Fiber: 4g
- Protein: 7g
- Cholesterol: 55mg


