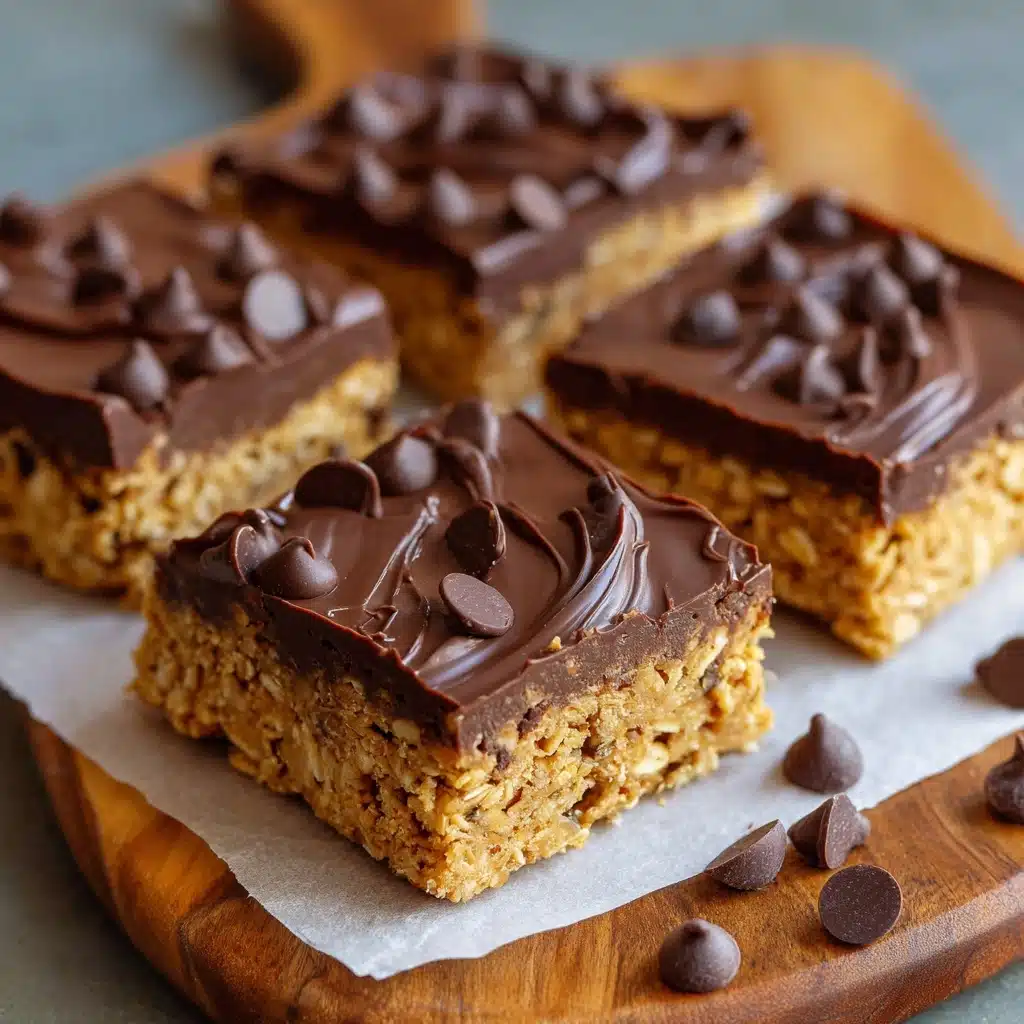
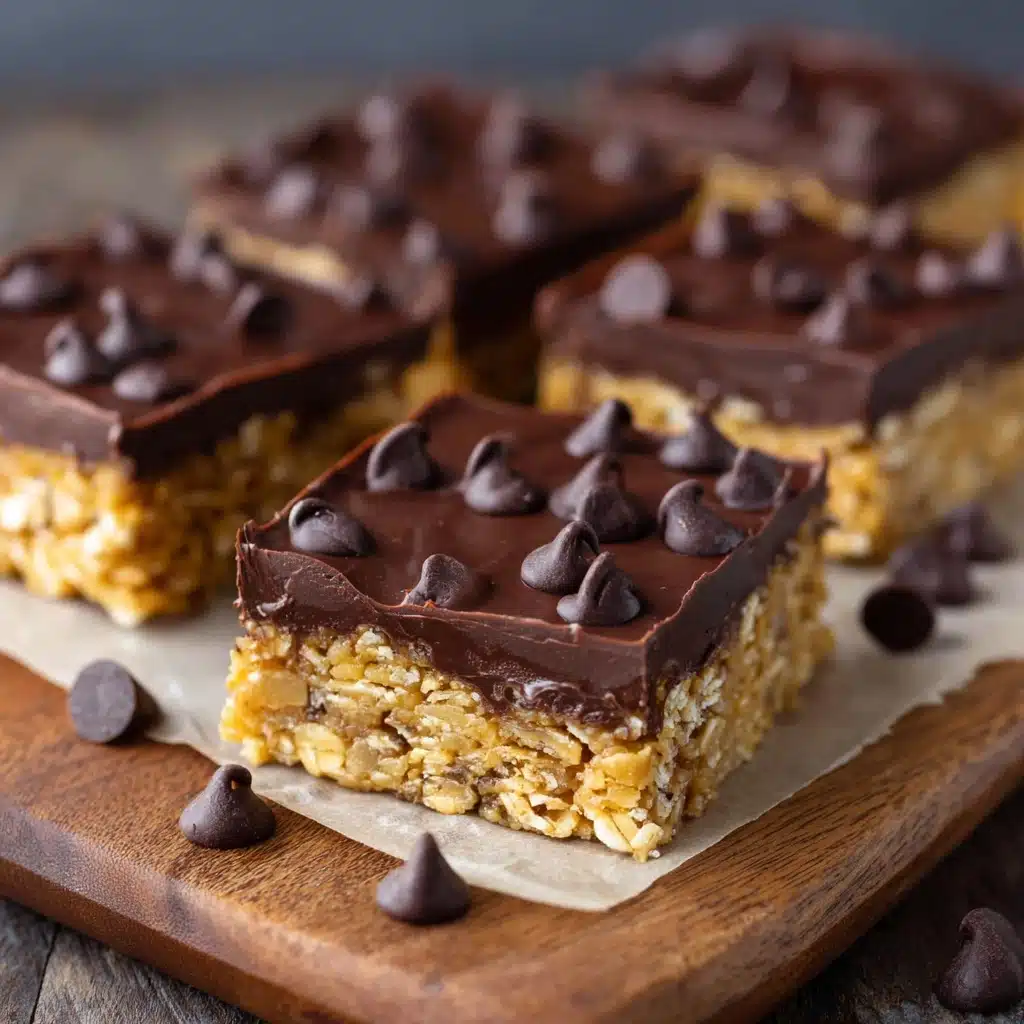
No-Bake Chocolate Oatmeal Cookie Bars Recipe
When you’re craving something chocolatey, chewy, and just a little bit nostalgic, these No-Bake Chocolate Oatmeal Cookie Bars are the answer to your dessert dreams. They strike that perfect balance: rich cocoa flavor, a hint of peanut butter, and the satisfying bite of rolled oats, all without ever turning on your oven. Whether you’re looking for a family-friendly snack or a quick treat to share at a gathering, this recipe is a guaranteed crowd-pleaser with minimal fuss and maximum deliciousness!
Ingredients You’ll Need
The beauty of No-Bake Chocolate Oatmeal Cookie Bars lies in their simplicity. Each ingredient truly shines, bringing unique flavors and textures that make these bars unforgettable. Here’s what you’ll need and why each one matters:
- Old-fashioned rolled oats: They provide the hearty, chewy texture that makes these bars so satisfying.
- Creamy peanut butter: Adds richness and helps bind everything together while giving a subtle nutty flavor.
- Honey or maple syrup: A natural sweetener that keeps the bars soft and perfectly sweet.
- Unsweetened cocoa powder: Delivers that deep, irresistible chocolate flavor.
- Coconut oil or unsalted butter: Ensures a smooth, melt-in-your-mouth texture and helps the bars set properly.
- Vanilla extract: Rounds out the flavors with a warm, fragrant note.
- Salt: Just a pinch to balance out the sweetness and intensify the chocolate taste.
- Mini chocolate chips (optional): For extra bursts of chocolate and a little bit of fun in every bite!
How to Make No-Bake Chocolate Oatmeal Cookie Bars
Step 1: Prepare Your Pan
Start by lining an 8×8-inch or 9×9-inch baking dish with parchment paper. This simple step makes removing and slicing the bars a breeze, plus it helps prevent any sticky messes. Trust me, you’ll thank yourself later!
Step 2: Melt and Mix the Base
Grab a medium saucepan and add the peanut butter, honey (or maple syrup), cocoa powder, and coconut oil. Warm everything over medium heat, stirring often until the mixture is silky smooth and just begins to bubble gently. This is where all those flavors start melding together, creating the irresistible chocolatey base of our No-Bake Chocolate Oatmeal Cookie Bars.
Step 3: Add Vanilla and Salt
Take the saucepan off the heat and immediately stir in the vanilla extract and salt. This boosts those cozy, dessert-like flavors and ensures every bite is well balanced.
Step 4: Stir in the Oats
Pour the rolled oats into the warm chocolate mixture and mix thoroughly until every oat is evenly coated. This is where the magic happens—the oats soak up all that chocolate-peanut butter goodness for the perfect chewy texture.
Step 5: Add Chocolate Chips (Optional)
If you’re using mini chocolate chips, let the mixture cool for a few minutes first so they don’t melt completely. Then, fold them in for little pockets of chocolate in every bar. This step is optional, but highly recommended for an extra chocolate boost!
Step 6: Press and Chill
Transfer the mixture to your prepared pan, using a spatula or your hands to press it down firmly and evenly. Pop the pan in the refrigerator for at least 2 hours, or until the bars are set and easy to slice. Patience pays off here—the bars hold together best when they’re fully chilled.
Step 7: Slice and Enjoy
Once the bars are firm, use the parchment paper to lift them out of the pan. Slice into bars or squares, and get ready to enjoy the easiest, most delightful treat you’ve made all week!
How to Serve No-Bake Chocolate Oatmeal Cookie Bars
Garnishes
For a little extra flair, sprinkle the tops of your No-Bake Chocolate Oatmeal Cookie Bars with a pinch of flaky sea salt, a dusting of cocoa powder, or even a few extra mini chocolate chips. These finishing touches add both beauty and a little extra flavor punch.
Side Dishes
These bars pair beautifully with fresh berries or sliced bananas for a healthy twist, or you can serve them alongside a cold glass of milk, a hot cup of coffee, or even a scoop of vanilla ice cream for an indulgent dessert moment.
Creative Ways to Present
For parties or lunchbox treats, wrap individual bars in parchment or wax paper and tie with twine for a rustic, homemade touch. Arrange them on a colorful platter, or layer with wax paper in a cookie tin for an easy, giftable treat everyone will love.
Make Ahead and Storage
Storing Leftovers
Keep your No-Bake Chocolate Oatmeal Cookie Bars fresh by storing them in an airtight container in the refrigerator. They’ll stay chewy and delicious for up to a week, making them perfect for grab-and-go snacks or a quick dessert any time.
Freezing
Want to stock up? These bars freeze beautifully! Place bars in a single layer in a freezer-safe container, separating layers with parchment paper. They’ll keep well for up to 2 months—just thaw in the fridge or at room temperature before enjoying.
Reheating
These bars are best enjoyed chilled, but if you prefer a softer texture, let them sit at room temperature for about 10 minutes. There’s no need to microwave or bake—just slice and savor!
FAQs
Can I use quick oats instead of rolled oats?
Absolutely! Quick oats will give your No-Bake Chocolate Oatmeal Cookie Bars a softer, less chewy texture. It’s a great option if you have little ones or simply prefer a tender bite.
How can I make these bars vegan?
Simply use maple syrup instead of honey, coconut oil instead of butter, and dairy-free chocolate chips. That way, your No-Bake Chocolate Oatmeal Cookie Bars will be entirely plant-based and just as tasty!
Can I add mix-ins like nuts or dried fruit?
Definitely! Chopped nuts, shredded coconut, or dried cranberries make fun, flavorful additions. Just fold them in with the oats for a custom twist on your bars.
Why won’t my bars firm up?
If your bars seem soft or sticky after chilling, it could be from warm kitchen temperatures or not pressing the mixture down firmly enough. Just pop them back in the fridge for a bit longer or try freezing for 30 minutes for a quicker set.
Are these bars gluten-free?
Yes, as long as you use certified gluten-free oats, your No-Bake Chocolate Oatmeal Cookie Bars are a wonderful gluten-free treat perfect for just about anyone.
Final Thoughts
If you’re searching for a recipe that’s easy, satisfying, and full of chocolatey goodness, you can’t go wrong with No-Bake Chocolate Oatmeal Cookie Bars. Give them a try—you may just find yourself making them week after week!
Print
No-Bake Chocolate Oatmeal Cookie Bars Recipe
- Total Time: 2 hours 15 minutes
- Yield: 12 bars 1x
- Diet: Vegetarian
Description
These No-Bake Chocolate Oatmeal Cookie Bars are an easy, delicious, and healthy treat combining wholesome oats with rich peanut butter and chocolate. Perfect for a quick snack or a satisfying dessert, they require no baking and just a handful of simple ingredients. With a chewy texture and a chocolatey flavor, they’re ideal for those seeking a convenient gluten-free and vegetarian option.
Ingredients
Base Ingredients
- 2 cups old-fashioned rolled oats
- 1 cup creamy peanut butter
- ½ cup honey or maple syrup
- ¼ cup unsweetened cocoa powder
- ½ cup coconut oil or unsalted butter
- 1 teaspoon vanilla extract
- ¼ teaspoon salt
Optional Add-ins
- ½ cup mini chocolate chips
Instructions
- Prepare the baking dish: Line an 8×8-inch or 9×9-inch baking dish with parchment paper to ensure easy removal of the bars later.
- Combine wet and dry ingredients: In a medium saucepan over medium heat, combine the peanut butter, honey or maple syrup, unsweetened cocoa powder, and coconut oil. Stir frequently until the mixture is smooth and just begins to bubble, which should take about 3-5 minutes.
- Add flavorings: Remove the saucepan from heat. Stir in the vanilla extract and salt to evenly distribute the flavors.
- Mix in oats: Add the rolled oats to the saucepan and mix thoroughly until all oats are fully coated with the chocolate and peanut butter mixture.
- Incorporate chocolate chips (optional): Allow the mixture to cool slightly before folding in mini chocolate chips so they do not melt.
- Press mixture into pan: Transfer the mixture evenly into the prepared baking dish. Use a spatula or your hands to firmly press down and compact the mixture for sturdy bars.
- Chill: Refrigerate the pan for at least 2 hours to allow the bars to fully set and firm up.
- Serve: Once chilled, lift the mixture out using the parchment paper and cut into 12 individual bars or squares.
- Storage: Store the bars in the refrigerator to maintain their texture and freshness. They keep well for up to one week.
Notes
- You can substitute quick oats for a softer and chewier texture.
- Add shredded coconut, chopped nuts, or dried fruit for added flavor and variety.
- For a vegan version, use dairy-free chocolate chips and coconut oil.
- Pressing the mixture firmly into the pan is key for sturdy bars that hold together well.
- These bars can be stored in an airtight container in the fridge for up to a week or frozen for longer storage.
- Prep Time: 10 minutes
- Cook Time: 5 minutes
- Category: Dessert, Snack
- Method: No-Bake
- Cuisine: American
Nutrition
- Serving Size: 1 bar
- Calories: 210
- Sugar: 11g
- Sodium: 90mg
- Fat: 13g
- Saturated Fat: 6g
- Unsaturated Fat: 6g
- Trans Fat: 0g
- Carbohydrates: 20g
- Fiber: 2g
- Protein: 5g
- Cholesterol: 0mg


